You are in for a treat today! My lovely wife, Katie, has agreed to do a guest post for today, as I have just been doing homework for almost 4 hours straight, after being on campus for a long time, too. Oh before she writes, I wanted to share some sad news. I learned that they are closing down the Switzerland Zurich Mission (where I served) and they are combining it with the Germany Munich Austria Mission. I wonder what they're going to call it. The Germany Munich Austria Switzerland Mission? I hope not. I also heard that they are combining the Hamburg and Berlin missions, too. Now there will only be three German speaking missions in the world. Anyway, without further ado, here's Katie!
Bryan, thanks for that depressing intro. Anyway...
I really like to make things. In particular, I do a lot of sewing. Bryan often remarks how impressed he is with the things I sew and I'm fairly sure that a lot of his fascination is due to the fact that he doesn't really understand how sewing machines work. I thought that since Bryan likes to tell us all little factoids, an explanation of how sewing machines work would be appropriate for a guest post on his blog. So, here we go.
The other day I was talking to somebody about sewing (I forget who. Maybe Lisa?) and Bryan piped up, basically stating that sewing machines worked like this:
By the way, they don't. The stitch pictured above is called a "running stitch" and requires just one thread to go up and down through a piece of fabric. Actually, sewing machines use two threads at once. It looks like this:
To explain this picture, let me start with a spool of thread.
You start by putting your thread on its little spindle at the top of the sewing machine (that little white pointy thing sticking up).
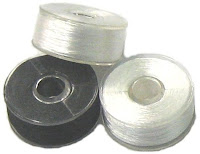
Next, using your sewing machine (I'm not going to explain this part) you wind some of the thread from your spool onto a bobbin. There are a variety of bobbins.
It just depends on what kind your sewing machine uses. My machine uses some plastic ones that look like these:
But it doesn't really matter because all bobbins work basically the same. Anyway, so now you have thread on your spool and on your bobbin. The spool of thread stays up on top where I already showed you and the thread from it gets threaded through a number of levers on the sewing machine, finally ending with the spool thread coming out through the eye of the needle.
Next, the bobbin is placed down in its little home underneath the presser foot. When the bobbin is threaded, the end of the bobbin thread is pulled up to the surface of the sewing machine base.
Now, you have threads coming down from the top as well as up from underneath. Are you still with me? Because now we can finally talk about that picture I showed you at the beginning.
In this picture, the yellow thread is the thread coming from the spool and the green thread is the bobbin thread. The picture basically speaks for itself now that you can read the images in context, but basically what happens is this: as the needle goes down, the thread from the spool catches the bobbin thread and they form a sort of chain with the bobbin thread always remaining on the bottom side of the fabric and the spool thread always remaining on the top. Looking at the animation of the above picture HERE will give you a better understanding of what I mean.
Oh! Now I remember the conversation that started all this. I was going to sew something and Bryan asked if I used a red bobbin thread and white spool thread if it would result in a candy cane sort of look, with each stitch alternating between white and red. Now that you understand how a sewing machine works, do you know the answer to Bryan's question?
Well, I hope you all enjoyed this little lesson. Class dismissed!
And now that you are a pro at using a sewing machine, if your looking for some great projects, you can come check out my blog Notes From A Very Red Kitchen. See you soon.
Answer: No. It would just be white thread on top and red thread on the bottom. And if the machine's tension was a little off (as often happens) then the top of the fabric would likely look like a white line with little red dots in between each stitch, while the bottom would look just the opposite--a red line with little white dots in between each stitch.


Genius! I've been sewing for 43 years, and I never knew how the threads work together. The diagrams are cool. Sadly, I couldn't watch the animation because it's blocked here at school...evil animation...probably from an evil "social networking" site - they're all blocked! But I'll watch it from home, and then, my sewing machine won't be magic any more. Love you, Katie! You're so smart!!
ReplyDeleteI definitely know the answer to the question- NO! Sometimes when I am very lazy I don't even change the bobbin thread at all...as long as it isn't like black on white fabric or the backside will be somewhat visible.
ReplyDeleteSorry about the missions though...nuts!
That animation is amazing. I could watch that for hours. Well, maybe I could watch it for minutes.
ReplyDeleteDon't worry Bry, my mission got closed and combined with the north mission last summer.....it just makes me feel more special to be one of the few people that got to serve in that mission ;) and I have a deep respect for sewing machines now.
ReplyDelete